Tuesday, August 24, 2010

Oliver + S = Adorable Baby Gift

If some people call themselves "Selfish Seamstress," I surely should be called the "Crabby, Sassy, Bitchy, Sarcastic Seamstress."  Not all at once of course but at different times I'm each of these.  Overall, I think sassy says it all most of the time.   But one fine day I inadvertently lashed out at an acquaintance about why I don't attend baby showers (a reason I should just share with my inner-self during our constant dialogues about what's wrong with us and how we will fix it someday when we have time or more insurance for therapy).

Thumper
Olympia/Clairee
Often times, I should really just follow the advice of Thumper,"If you can't say anything nice, don't say anything at all."  However, in practice, I end up following the Olympia Dukakis/Clariee in Steel Magnolia's motto "If you can't say anything nice, come sit by me." 


The truth of the matter is that I love babies.  I love my nieces and nephews too and would shower them with gifts every moment and adopt them to live with me if their darn parents weren't so attached to them.  But they are older now and babies smell so damn nice and say goo goo and are overall just lovely, especially if you can hand them back to their parents when they cry or get stinky.

Anyway, although I don't like attending baby showers, I like making stuff for and buying gifts for babies and baby showers.  And that's what I really should have said to the mother-to-be (third time) who was very insistent that I should be ecstatic about attending her shower.  Instead I assured her that as a single woman, who has not been married, and has no children, who is about to turn 40 and who has attended over 1 million showers of all manner, that I have happily attended my lifetime fill of showers and would kindly decline attendance.   But, I made a gift because although I'm a sassy, bitchy, brat, I am generous.

So I embarked on the journey to make the Oliver + S Bedtime Story Pj set and by doing so completely ripped off (and or got inspired by)Amber who made such an adorable set with matching blanket.

And here's my finished set.  Fabric is Kitties wearing kimono's, trimmed with bright yellow.  I thought that was fun and cute considering it was a kimono style! Pattern Review click link.
Try not to be distracted by the tiny stain on my carpet.  Can you see the ginormous mistake I made?
Then, inspired by this Pairie girl's incredible quilt made from this beautiful book,
 I purchased the book  thinking surely someday I could make something as beautiful as that.  And the book itself is just so lovely.  I went with a 1 hour project to wet my feet, a bound baby blanket using the kitties with kimonos as the binding.

I've never made a quilt but my mother always wanted to quilt. She even bought a huge frame, and I'm sad to say never used it.  I'm even sadder to tell you that we got rid of it because it was ginormous.  I wish upon wish I had kept it even though fitting it into a tiny dorm room might not have been practical. 
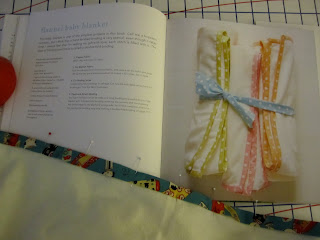
So in my true, don't read the directions cause you think you know everything fashion, I prepped the binding the night before by pressing it into what would be like store bought double fold binding.  Then of course I read the directions the next morning that you don't press it if you are doing the hand stitched version.  DARNIT!  But, have no fear, there is a machine version, which is all I had time for anyway, using a folded/pressed version, so I zipped it together and it turned out pretty cute. I will say the directions weren't the greatest, but it turns out they are if you are doing it at the same time vs. reading it before hand.  And since I was wanting someone to better illustrate how to do the corners, I'll attempt to show it here:
Sew along one side till you get to the end.  Back stick and or tie off your ends, trim.
Then to miter the corner, the book says: "Fold binding strip straight down, with the two halves of the tape encasing the quilt edge."  I'll add that the corner becomes like a present, and naturally forms a triangle on both sides.  Pictures, are better..
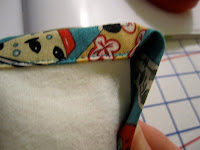
Both sides will look the same. 
I have no idea if this is helpful to anyone.  I didn't quite get it when I read the book and looked at the pictures, but I actually instantly understood once the fabric was in my hands.  If you think this is daunting, think again.  It's really easy and what a cute finished product.
Folded blanket corners

Gift presentation. Blanket folded around pj set, tied with extra binding.  Card sewn with contrast thread and scrap of fabric.


And in the end, I packed the gift off to the hostess, collected her children, and while women sat together swapping gifts, eating artichoke dip and doing whatever else was planned at the baby shower, I enjoyed the latest installment of Toy Story with three of the cutest kids I know.   Getting to be Auntie Shannon is one of my greatest joys.

Sunday, August 22, 2010

Tropical Print Dress, BWOF 6/2010 dress #123

Tropical disaster dress......

You'd think a dress that has two pieces would be easy for any sewer to execute with no problem.  That is where you are wrong (or I was wrong).  If you have any degree of smug confidence that is where you begin to disregard the instructions and trouble ensues......


Maybe it's the translation of instructions from German to English or maybe it's because I had two glasses of Chardonnay while attempting this dress, but each step I had to redo or fix.   Actually, I didn't have any wine while making this dress.  Only good 'ol Crystal Light, but it has so far been fraught with peril. Ah, the drama.....
So the dress comes in 38-46.  I cut a 40. The dress comes in two iterations- one with pockets and lace trim and one w/out pockets and lace trim.  So I traced the pieces and anyone who has traced off these pages knows it's a trick of the eye to find the right lines and follow them. But, the weird thing was that at the bottom hem of the front piece, instead of a solid line, there are just arrows coming down the side seam.  I had no idea what this meant so I just connected them across and made that the hem line.   Well it turns out that this length garners me a pattern piece that is about 4" too short to match up with the side seam. 
So I had to piece in a panel to extend the length to meet the other piece.  Because of the print, you can't even detect it in photos or in person.  Even that, didn't help my micro mini length that is exacerbated when belted.  And I didn't find it out till later. 

Anyway, you follow the first step and it says to "neaten seams" which I read as trim seams.  Then I connected connect the front to the back  at the back yoke area and reread the first step "neaten seams" which meant that I cut off the BLEEPing seams that were supposed to be the casing for the elastic. UGH!

So, I fixed that by making a makeshift casing out of bias tape.  That didn't work great and the casing kept slipping out of the stitching which makes it weird to gather the elastic.  I ended up having to pull out the elastic twice and put it in again for that reason.
After rushing to finish this so I could take it on my OSU weekend visit to Corvallis, it finished up ok, without further issues.  Looks pretty cute, but I'm not wild about it.  It's kinda boring and doesn't really do anything for me.  I really dig this fabric but, think it deserves a less sackish dress.
                                        KKG pledge sisters, class of '90 L-R: Traci, Sheila, me, Kim
Here we are on the steps of the OSU MU- that was closed, darnit.  As you can see I'm hunching, perhaps due to the french fries I ate for lunch (as an entire meal- as if I were still in college) or maybe to attempt to make my mini look less micro.

                                                         KKG pledge sisters, class of '90 L-R:Sheila, me, Kim, Melissa
 I don't have pics of me in it from the back but in hindsight it was 95 degrees, and this was quite comfortable.  I usually need something covering my shoulders and chest for sun shade reasons and the fabric was breathable and didn't stick to me. My thighs did stick to the booth in the restaurant but that's gonna happen.

Here's the back view on the form.  The moral of my story is not to be so smug that I know everything and read the directions more carefully, don't watch re-runs of Criminal Minds while sewing, and cut the attitude lady.

Wow, I think I just opened a can of whoop ass on myself. Where did that come from?
 
Post script- What a fine looking group of ladies.  AND, I never realized how much shorter I was than all my friends.  Note to self, meet shorter friends so I look taller or wear heals.

Saturday, August 21, 2010

Things that make me happy....

People spend so much time talking about what they don't like, I love to tell anyone who will listen, what makes me happy.  It's little things. 

Running on the waterfront in Portland makes me happy.  I've started running this year and I'm REALLY slow, but that doesn't matter.  It matters that you get out there an do it. And it makes me feel great.

I go running on the waterfront along Tom McCall Waterfront park


and do the big 2.5 mil loop across the Steel Bridge,


 along the Vera Katz promenade on the east side,


under the Burnside bridge, under the Morrison bridge and up and over the Hawthorne Bridge back to

the Tom side.

Along the way I pass tons of runners training for the marathon, groups jogging with friends, peeps struggling to keep going like me.   I also pass masses of bikers either training or commuting, tourists out for a morning stroll with some great coffee and homeless people gathering their bedding from a nights sleep in the out of doors.

And all the while I get a fabulous view of the lovely city that I grew up in and came back to.  I'm thankful for my health, that I can attempt to run, that my lungs and legs work, and that the city put in such a nice place to enjoy the out of doors.

If you've never been here, it's as wonderful as they say.  Uh, but don't come here to stay, we're full.
Keep Portland Weird!

Thursday, August 12, 2010

40th Birthday Dress- Vogue 7848

This weekend is the long planned 40th birthday of my best friend, the beautiful, Jacqui.  We've been friends since high school, that's over 20 years! I'm really excited for the party as her family is flying in so we'll get to catch up with them AND lots of friends will make a surprise cameos- hope she doesn't read this.  The setting is the beautiful "tasting barn" on the vineyard at Terra Vina in Wilsonville, OR. 

Of course, I want to look fantastic because I know there will be bunches of pictures taken and it's a party and I'm only 5 months behind her in the run up to 40.   So there you have it, I'm vain and I love to dress up and make stuff.  Isn't that why there's a blog?

Originally I was going to make this dress Vogue V1174, a Cynthia Steffe, out of this fabric.
I blogged about it here, but with everything going on, and after reading this pattern review from Erica and this review from Tasia, this dress sounds very time consuming, so I changed my plan to make the similar but simpler Vogue 7848.  AND I had an unfortunate prewashing blunder with this fabric.  You might be able to sort of see from this photo the cool texture this fabric has, which made it look rich and fine.   I just blazed forward and prewashed it not using my brain that it's COTTON,  and the texture washed out.  DOY! (you don't get enough doy these days so here's yours).  Part of the reason I put it off starting till we were a week away.  I really wanted that fancy fine look for the original dress and I even considered going and buying more of the same fabric, but that seemed wasteful and I wasted a week or so kicking my self (now my leg hurts and I was pretty much out of time).   Anyway, then it occurred to me I had purchased the other pattern that also is strapless, has boning but is easier to make, as advised on all the pattern reviews, and maybe that would be better. Sigh....whew!  Problem solved- charge forward.  
Pattern review link will be added in a later edit.
Pattern Description: Princess seam A line dress with close fitting boned bodice.
Pattern Sizing: 6,8,10 : I cut a 10
Did it look like the photo/drawing on the pattern envelope? Yes, more so before I took out some flair and hemmed it above the knee.
Were the instructions easy to follow? Absolutely! This dress is pretty well drafted and the instructions with drawings are great to follow- very very easy and no confusing parts that you have to do to understand. The boning is really easy to put in and I followed a tip from someone at the fabric store who told me when the boning comes on a roll and rolls one way, alternate the direction of the curve when you sew it in so that you don't get a bodice that curls one way before you wear it.
What changes did you make?  I did a full bust adjustment and shortened the total length to the knee.
I didn't make another muslin after the first one that I blogged about before, so when I then cut the fashion fabric and fitted it again, it fit perfectly with using the full 5/8" seam allowances, instead of the 3/8" that I had used on some seams for the muslin.  I went back to the pattern and shaved off some of the flare since I shortened it to above the knees, it was too much flair for that short of a dress.  Then I finished the princess seams with black 1/2" single fold seam binding so that the inside is as beautiful as the outside.  I finished it up to just above the point that the boned facing hits.
What did you particularly like or dislike about the pattern? Again, very easy to follow, however there was a strange length issue with the facing that I might have created myself when I adjusted the pattern.  Also, there is a shape at the side back bodice near the underarm that again might have become an issue because I altered another piece, but I ended up taking it in at that point or it would have caused gaping at the under arm. Actually the final garment has a slight gap at that point.
 
For the facing, I had just enough of the face fabric to use for it.  The facing is where the boning is installed and also having read the pattern reviews, I finished the bottom edge with petersham, and added a little hook/eye at the center back to cinch it in a little and help hold the whole thing up.  I got that from the last pattern review- didn't make it up on my own.
Here it is installed in the garment.  That pin came out later.
Would you sew it again? Would you recommend it to others? I LOVE the way this fits and looks. Half of design is choosing the right fabric and trims to make a great look.  I love this one.  Some of it could be the fabric against my skin but I really like the support and shape that the boning gives and it's super comfortable.  Of course I have yet to wear this for an extended period of time for full evaluation.  We'll find out if it's really comfortable after a long party.

Lots of pictures will be taken this weekend.  Will post those later for your scrutiny.  I totally recommend making this dress.!

Hoping to get out to see "Eat, Pray, Love" on Sunday. I loved the book.  I read it right when I quit everything (job, life, house, pets, garden) and moved back to Portland. I've been to all those countries and I needed a change.  I loved it.  Crossing fingers the movie does it justice.


 Here is a terrible quality picture of the dress on me.  After seeing the pictures from the party and the effects of setting up a party in 98degree weather, and having a beer and glass of wine, I am opting to not post those pictures.  I promise I'll get a better method of putting pictures of myself in these posts.  I guess i need to get over my hatred of photos of myself. If the camera adds 10 pounds I wonder "how many cameras are on you?"  Anyone know what that quote is from?

post script note- I would not do the alternating boning again. It's a little odd.  At least for the two front ones, i'd make them the same. I think overall, I should just cut a 10 and no FbA.  I think would have been fine w/a smaller one or none at all.  I still suffer from thinking I'm bigger than I am.

Wednesday, August 11, 2010

Where for art thou August issue of Burda Style Magazine?

I'm over this monthly search for one of the few copies of Burda Style Magazine that make it to Portland Oregon. 

On Sunday and Monday I hit Powell's World Of Books, Rich's Smoke Shop and called Bolt Fabrics.  No one has their copies yet.  Just now at lunch I went to Josephine's Dry Goods to buy bias tape for the last seam on the 40th birthday dress and I exclaimed out loud, "Oh!" and then "oh."  when I saw a Burda sticking out of the mag rack but then quickly realized it was a Plus issue from last month.  I didn't even  know that they carried it and the lady at the counter said that EVERYONE is waiting.

Powell's seems to get theirs mid month and it costs $9.00.  Riches Smoke Shop gets ONE copy, a few days earlier but it's $11.50.  When I was in there on Sunday the guy said someone bought it but I don't think it's really come in yet.  They told me to call late on Thursday when they get their next shipment. It's all a little bit more hoop jumping than this circus girl wants to do. But what else CAN I do?

Does everyone have their copy but me?  I'm pouting with my arms folded- wah!  What I don't understand is why in this day and age it takes so long to get issues from Germany to the west coast of the USA.   I am expecting them to stock the September issue (coveted) any day now, why can't they (the magazine distributors) get us a copy by the first week of the month it's publish for?  Why is it so hard? Am I in a snit for nothing?  I don't see anyone recapping the magazine picks yet, maybe I'm being unreasonable, and yet high expectations have taken me far in life.   WHERE IS IT?

Then I found this link for Canada that says it's mailing August 9th!!!  Balls, that was Monday, does that mean it's leaving freaking Deutschland on the 9th?

Is it time for me to get a subscription? I was thinking that might be a good Christmas or birthday present request (maybe a few people could get together).  However, I'm still waiting for my subscription to Vogue that the person who drew my name for Christmas opted not to get me even though they asked me specifically what I wanted.  I just don't know if my heart can take the toiling over when it will come in........
sigh....... rant complete.   Carry on with your day.

Sunday, August 8, 2010

FBA is like magic........who knew?

I'm sure all of you out there already knew this, but when I appeared on the scene a few months ago, I had no idea what FBA was. So, I looked it up and found out- hey, I need that.   I read this post on Sew Mama Sew and that's when I found out that most patterns are drafted with B CUP!!!!!!!!   Yikes.  Doesn't work for me, a full figured gal, between c and d depending.  Maybe I never noticed since their patterns have so much wearing ease that they swim on me if I follow their prescribed measurements.  What a revelation all around- LITERALLY!

Anyway, I'm making a princess seam dress that's woven and close fitting so, I knew I needed this.  I'll post more photos on it later (if it really turns out), but here is what I did for the FBA.  


I traced my pattern in case I just shredded the original, I wanted to protect it from my JV pattern alterations. Then I drew a line straight down from the bust pointish area, one out to the side seam and one 1/3 into the armhole. 


Then I slashed through all of those and spread.  The directions say to do the amount difference between your high bust and reg bust, but I think that's if you buy a pattern based on your high bust measurement.  I had a size 10 which is way smaller than that but based on all the pattern reviews saying the bust came out huge I sized way down and just went for it.


Spread about 1 1/2" wide which spread the "bust dart".  I taped down the vertical slash and,
then slashed out to the bust point toward the cf edge, closed the side bust dart and pivoted open the bust edge on that tiny hing at the point.  When it was finished, it didn't seam like enough.  But I wanted to try it.  I sewed up a muslin and used 5/8" seams.  First try on it's snug, so I took out side seams to 3/8" each and it fit much much better.


Of course it fits dress form big, but on my bust it fit perfectly EXCEPT that it was sitting too low on my chest.  I knew I'd be tugging it up all night if I didn't add more length.  So I slashed the pattern near the top edge and added 3/8".  I figured I can sew the facing in at 3/8" and keep a little bit more of the length.  Now ask me if I made another muslin.  Nope, just went ahead and cut the fashion fabric.  I'm crossing my fingers that it's an ok adjustment.  eeeek.  Oh, and the other thing I did was to re-draw/smooth out the curve of the side front because it had an awkward 50 cone bust pointy thing happening.  This could cause tragedy too but from the look of the pattern piece it should be ok.  I re-walked the pattern seams and made sure it matched length of the center front piece.  I also shortened the dress quite a bit to above the knee and in doing so I shaved off some of the flare.  Should be ok- famous last words.

You might be wondering why there is a decorative set of faggoting stitches in the center front of this garment.  Well, the answer is that despite what I knew about FBA, I took my scissors and slashed the CF to uhhhh, I'm not sure what I was trying to do.  Maybe see if I could give it a little more width and that would fix the issue, but in the end I just took out the side seam, and had to figure out if it fit, so I used one of my fancy stiches to fanken-stitch the front together.  Worked like a charm, looks weird but who cares.  Alrighty, we'll see if it works out tomorrow or soon......  have a great night

Wednesday, July 21, 2010

BWOF 6/2010 skirt 134, Revival of Sloppy College Sweatshirt.


Let it be said that I'm new to the blogging thing.  And therefore, I get going on a project and forget to take pictures as I go and end up trying to retro fit it so you can see what happened.  Here it is the original Oregon State University Sweatshirt.  (PS. I did not pick my living room rug based on my college affiliation)

Now, I graduated in '93, and I'm positive that I bought this either upon exiting the school or some time shortly after so it's a total mystery as to why it says 88 and why it shows XL as the size because it is a large.  At any rate I've had it in my closet for close to 18 years and I never never never wore it even around the house.  About 3 years ago when I moved back to Oregon from California I tried to motivate myself to wear big sloppy collage sweatshirt by cutting the neck a la Flash Dance, but alas it become no more appealing to wear. 

So, I've had in my head for some time to make it into another garment because it's a really great quality Champion thick fleece and if you look in the fabric stores it's nearly impossible to find a brushed fleece in heather gray anywhere.  Along comes the June issue of Burda Style and what do I find in the "sewing and styling" section but a grey fleece skirt and lo and behold there's a pattern for it!  Yippee.  Enter big sloppy college sweatshirt that has followed me around for 18 years and my scissors.  I cut and assembled part of the skirt before I took the above picture but you get the gist that this is what it looked like before I cut it up.  Anyway, I decided that I wanted to use the bottom rib hem for the hem of the skirt so I just layed out the pattern pieces and cut so that I just had to sew the darts and side seams. Magic right? 
The lame part was that in order to do that it meant that I could't get much of the design on the actual skirt piece because it was so long and I wanted it above the knee. And, I thought it was better to have the rib at the bottom then to have the logo XL across my bottom, which it kind of is, but if I wear a shirt untucked you don't see.  I'm going to go out on a limb and say that this does absolutely nothing for my actual XL a$s, but man is it comfy.   I digress.  So I ditched the pockets even though I did cut them out of leftover black knit and I was going to use the rib as the pattern advises, but because the way the sweat shirt was originally there is a double panel of rib along the side seam so that would be WAY too bulky on my hips and I didn't need the pockets.   The waist is finished with a facing and then the black and gray cording is passed through it for a drawstring.  I just punched holes in the front with my eyelet tool from scrapbook world.  I'm sure they'll frey out at some point.    But it works for now.
And finally because there was only half of the design used for the back panel, I thought I would use the rest to make a little kanga pocket on the front, repeating the rib at the edges of the pocket openings there instead of at the side seam. 

I just applied it flat to the front panel w/a raw edge in the rip n repair sort of manner which makes it OK that the the design is not centered on the pocket but pretty much is on the garment.   Also, I don't have a close up, but the bottom edge of the pocket is not jaged it's just the negative space in the print making look like it is.   

So there you have it the random skirt that I made from an old college sweatshirt and am actually wearing to work today.  We have a pretty casual crew here but I do usually try to step it up.  Then my boss tells me that some peeps are coming from a well know shoe company, that we are doing a collaboration with, today and I'm totally embarrassed that I'm wearing a sweatshirt as a skirt to work when we have a meeting that I didn't know about.  Whatever, they can get over it.    This is the perfect skirt for lounging around, doing laundry, running to the grocery store etc.  AND, this weekend I'm going down to OSU w/my sistas to visit the old sorority and have a sleepover!  So I can wear this skirt while we braid each other's hair and have pillow fights (yeah that's what we are going to do with our time).  Yes, look out Corvallis, we're coming to the Kastle and you will never be the same.  If we can stay up past 10 pm that is..... AND I hope to purchase another college sweatshirt or item that I will actually wear.

Sunday, July 18, 2010

Coming up on a very special... Circus.

I hit the fabric store on my half day Friday to pick up fabric for my next few projects.  The store was empty except for the staff who all hung out with me ooing and ahhing my fabulous fabric choices.  I felt very special.  I know they were just bored but hey, I had fun.

First up: 40th birthday party dress 
My best friend's husband and I are throwing a "surprise" birthday for her 40th in August. We are having it at a winery in Wilsonville.  I hope this turns out well and in time for the party.  Stay tuned. Now I just need to figure out what to wear to MY 40th birthday party. I have 5 months. tick tock.
Next: This McCalls 6083 jumpsuit.  I'm either going to do; Crop pants w/halter B, or shorts with short sleeves D
I have no idea why I think I need this garment but I thought it might be fun to try this trend with a knit. Could be cute with a black belt and black sandals.  OR could be total disaster.  I know you are on the edge of your sofa.
Next, and actually I think I'm making this first:
BWOF 7/10 Dress123 in this lovely Hawaiian print.  I've become compelled to make a dress out of a tropical print.
I found this awhile back and took a swatch of it home. I thought I wanted to do this dress, Vogue 7848
and I think I was drawn to the tropical print on the envelope. Or maybe I was thirsty for a margarita and Jimmy Buffet was on the radio.  Anyway, I decided that I needed a dress with sleeves, so i had more options to wear it.  The Burda dress could be too dumpy though. I'm a little nervous about it being a sack. Let's see.

Saturday, July 17, 2010

Ikat Skirt- Self Traced/ Drafted pattern

In the way back I made patterns.  I totally hated it.  I much preferred draping to drafting.  I had no patience and didn't want to fuss around with the paper.  For some reason I'm into it now.  And, I think the results are going to be better this time around. 
For this skirt I copied my printed cotton canvas J. Crew skirt that fits well.  I wear it all the time so I thought it would make a good pattern.  I actually wear this more around my hips but it looks nicer on the form sitting at the waist.
First I laid out the skirt flat on top of a piece of pattern paper and then with my tracing wheel I traced around it along the seam lines as well as the waistband.  I really need to get a wheel with the long pins, but I haven't seen one in a while, I think my mom used to have one but maybe they don't exist anymore.

Anyway, then I traced the lines and trued the pattern so the pieces on the front and back walked and then added seam allowance.  I had to make the darts by slashing and pivoting and when I did this I still couldn't find my old pattern book so I'm not convinced that I did it exactly right but the outcome was great.  This sounds like it was fast but I went back and forth between my pattern and the skirt measuring, remeasuring and fixing things and then changing it.  At one point I changed something on the front only to realize I had just measured the back and had to do it over.  BUT, now I have this great skirt pattern.  So I guess it was worth it.

I made a muslin and it seemed too big, the orig skirt is a little big so I took out 1/4" of front and back. Bad idea- because that equals an 1" all around and it was too much.  The orig skirt sits at the hips and is short but with the low waist it is a reasonable length.  The new skirt fits like a glove but is now just a little too short.  And frankly, I have great legs, but I'm not 25 and I'm not Lindsey Lohan, so I have some sense of what is ok for my age group. Although, others might disagree.

I cut the  garment so that the stripe pattern was the same on the front and back.  I realized that I didn't have enough fabric to have the same pattern on the front and back waistband but since they are different, it helps me to remember which way to put it on.  I used narrow seam allowances to counter my pattern adjustment faux paux and I finished the seam allowances with bias tape since the fabric is loosely woven and frayed A LOT when I washed it.  To counter the shortness of the skirt I hemmed it by binding the bottom edge with bias tape and then just barely turned to the inside and hand stitched.

It has an invisible zipper that I did a shameful job of lining up, but it doesn't really effect the over all look of the skirt so I'm OK with it.   I wore this wine tasting last weekend when it was 85 degrees and it was really comfortable.  I think one of my friends has a picture of me in it, I'll see if I can get it. I swear I'm not camera shy but I don't really love pictures of myself and I don't have a tripod either.  I had some photos taken of me in some of the last few garments but that's when I noticed that you can really tell I've gained 5 pounds- blah.  I gotta get back to running more.......... OK, that's it for now. I'm off to Pump IT UP for my nephews birthday.  I'm scared.  Wish me luck.


Next up, planned projects. Fabric is in the dryer as I type this.

Tuesday, July 6, 2010

Vogue Wrap Dress Redux

Yo!  When they say, will you sew it again and you say yes- DO IT!
And here it is, the Vogue 1027 from this, my second post redone in a cotton jersey.  It's NOT peach. Not, not, not, peach.  It's kinda pinkie orange.  OK?

So I did some adjustments.  I took 1" out of the center front panel. and about 1/8" out of center back panel. And then I took 1" out of the skirt panel- 2" all around.  I had to stretch the skirt a tiny bit to fit the bodice but barely.   And that made the bodice fit better, BUT!  That's a big but.  The point that the tie comes from the bodice was even closer to center front so it doesn't give very much room to cinch/tie it.    So, it gives a wierd tuck at the CF- more than before when it was just big.

What I would do- if I were the type to rip this apart- is to take the waist seam apart, and finish the tie up to the side seam and then apply it to the waistband so that it would start at the side seam and have the whole front to cinch/tie.  I think that would take care of the awkwardness that makes it seem like it's too big but it's just really that the faux wrap tie apparatus doesn't have enough room to fool.   IF I were the type to rip this apart and fix it, that's what I would do.  Who knows, I might be that person tomorrow. Today it's 85 and summer in my apartment and I'm done for the day.

Oh yeah, I also left off the sleeve facing. I just finished the edge by pressing stitch witchery 1/4" under in place, then turning and pressing another 1/4" and top stitching.  Looks Great.  I did the same thing for the neck and front edge AND the hem.  I think it gave a great finished look. 

I think I'll wear this to work tomorrow- it's going to be 95! Finally, summer has arrived in Portland. YAY!

Maiden Voyage- Burda pattern 7493 view B

My first Burda!  From the 2010 collection:

I have not made anything from the magazine yet, but that's next. Have tracing paper, will trace. Stay tuned.

Fabric is 100% cotton Ikat woven stripe. Ikat is super hot right now. Mine is very light shirting weight, so I lined it with a 100% cotton lawn in olive color. Both fabrics purchased from the wonderful Josephine's Dry Goods in Portland, OR.

Since this was my first time making a Burda pattern, and the first fitted woven in many moons, I made a muslin.  Also, there was no pattern review yet for this style so I didn't want to risk it. Now there is!

Made the muslin out of, what else?  Muslin. Then put it on the dress form and marked the pieces with their pattern piece numbers. I wanted the side panel pieces to be on the bias, and then the side seams to chevron.  See below the interesting intersection of side seam and armband under arm. Next, I drew the direction of the grain that I wanted on each piece to guide me and marked the tissue pieces, so when I cut the fashion fabric I wouldn't get confused.  I also drew a sketch before hand- several actually.


I constructed the front and back bodice and skirt and then connected them at the waist, as the instructions. Then I also constructed all the same pieces out of the lining material, sewing them right sides together with the body fabric at the armhole and then turning the lining to the inside creating a clean finished armhole. This way I eliminated the facing (hate facings). 


The rest of the garment I made as per the instructions.  After getting hooked on reading all the blogs I was reminded by the lovely Amanda, that seam binding makes the a garment look finished and polished. She has some fantastic tutorials, and finishes everything beautifully.   My mother used to say "a garment should look as beautiful on the inside as it does on the outside."   Advice that I summarily ignored till I was in school and I was graded on it. Also, I realized that this fabric will probably fray a bit with washing as my other ikat project did when I pre-washed and lost about 1" to fraying.  So I used bias tape on the seam where I applied the zipper.

I finished the hem using 2" wide poly lace.  I didn't mean to get such a wide lace and then when I sewed it in it looked super cute, but itched the back of my legs like crazy when I sat down. So I need to take it out and do somethings else.

The fit of this garment was great in the chest and neck and bust. The mid bodice waist needed a little more fitting/shaping so it wasn't a "shapeless"shift.   I didn't go back in and adjust those seams as I didn't want to change the shape of the side bodice and skirt pieces. After seeing pics of me in it, I wish I did, but I've other Burda to conquer.

I know that with some drafting I could have adjusted the center and created more shape but ultimately I was looking for kind of a shift.  Also, it pulled a little at the hips in the muslin, so I sewed the side and cb seams with 1/2" seam allowance i/o 5/8".  I also shortened the skirt 5" so it was just above the knee.  This is a great kicking around doing errands when it's 80 degrees, or meeting friends for lunch dress.

The other advice I have on this garment is that finishing the neck band so that it's even is not easy. Mine looks a little wonky on one side but I think I might be the only one that can tell.  I would probably use a template constructed out of heavy paper to press it so that it's even all the way around. 

Edit... added photo 
Here it is: a photo of me in the dress.  I won't wear those shoes now that I see them.